SIMPLIFY 3D

Simplify 3D is a so-called “slicer” that, similar to milling, converts a CAM, CAD data into machine-readable code, so-called G-code. Here at NEVO3D we use the market leader Simplify 3D. Models can be easily imported and optimized. The software makes it possible to simulate the printing sequence before printing and thus identify possible problems at an early stage. You can find instructions on how to use Simplify 3D in our customer area
QUICK TIPS FOR A HIGH PRINTING SUCCESS RATE!
-
Engineering plastics require a heated build platform and cannot be compared to "hobby" materials, so a RAFT should be used to avoid/minimize warping and elephant feet.
- Use a RAFT to compensate for imperfections (air bubbles, scratches, etc.) and avoid adhesion problems. Our supp material (SUPPORT) adheres very well between the building platform and many model materials.
- For tall components with a small footprint, a brim should be used instead of raft. In addition, the sacrificial tower diameter and the base area (volume) should be increased so that the tower does not fall over or shear off during printing.
- Not every material had a good SUPP connection (e.g. PETG)!
- If there are adhesion problems between the raft and the model material, the “flow” for the first layer may need to be increased and the speed reduced.
- Direct prints (prints without raft) onto the build platform require a “Z0 calibration” before printing starts.
- Always uses a sacrificial tower/primepillar in dual pressure. This has essential functions and should always be placed close to the cleaning brushes!
- Pay attention to short distances between components, sacrificial tower and cleaning brushes.
- Use adhesion promoters if necessary for direct prints (prints without raft), especially for PC/PACF.
- Edged components/corners are bad in 3D printing, use curves in the construction!
- Wall thicknesses should be designed as a multiple of the extrusion width.
- Dual printing is a “must” for the best surface quality of supported surfaces!
- Dual printing requires calibrated tools (T0/T1). Before calibrating, the nozzles must be clean, otherwise measurement errors will occur.
- Use appropriately designed chamfers (pay attention to angles so no support is necessary) for the TOP/BOTTOM areas of your components! This eliminates elephant feet and material overhangs on top layers.
- Check your support structures in the slicer. SUPPORT islands should be avoided as they can easily fall over or not adhere to the build platform. S3D offers several solutions for this, such as expanding or connecting support areas.
- Intentionally creates a "sacrificial spot" (bulge with edge) in the "non-visible area" for retracts.
- Place the retracts in one line to create the best possible surface quality!
- Avoid accumulation of material and consider whether TOP/BOTTOM layers are necessary for your component/project! Material and printing time can be saved.
- Prints PETG/PLA/PACF/TPU with 75-100% case fan (fan 3), the build space must remain cool!
- PC/PACF/TPU should be dried, otherwise the surfaces will become unclean or print failure may occur.
- Small parts should be printed multiple times/together and not individually to allow the layer to cool.
- Different materials have different shrinkage, which also depends on the component size.
- Foreign material should be printed 15-20°C hotter than the manufacturer's specifications.
- Uses copper paste for the heat brakes and nozzle threads. There should be no air gap between the heating block and the nozzle. This can be avoided with copper paste.
- Only use IPA cleaner (Würth) to clean the printing plates.
- Make sure the nozzles are clean before starting printing and before each measurement.
- Components should cool slowly after printing or even follow a “tempering curve” to prevent distortion or increase strength.
- Only use fans in exceptional cases, as these have a negative impact on layer adhesion. Fans can significantly improve the quality of overhangs and fine details!
-
Nozzle T1 should always be used as a support nozzle.
Print GF and CF material with steel nozzles. - Process parameter sheet contains useful information about our materials regarding specific settings for the different materials (coasting, extruder streams, drying, etc.).
- TPE, the extruder flow must be reduced (see process parameter sheet).
- For TPE, the slicer settings for 0.4mm nozzles should be used, but a 0.6mm nozzle should be installed!
- If you change the printing speed, the K factor (Linear Advanced) must be adjusted! Without adjustment, holes or accumulations of material will form at the start or ends of the web.
- Detailed components should be printed with a small nozzle/layer height/speed! Basically, layer height = nozzle diameter/2
-
Slow printing with large nozzle increases strength. More perimeter instead of infill for increased bending strength!
- Whitening, through support or brim removal, can be significantly improved or completely eliminated by subsequent "flaming".
Inside-out prints: Setting has been developed for the best quality of walls (perimeter). Disadvantages are rounder edges, poorer quality of Z-Seam, elephant feet top/bottom layer. Printed parts should be provided with radii and phases to compensate for these disadvantages.
Outside-in prints: Setting is designed for the best quality of overhangs and edges. Advantages are sharp edges, good quality of Z-Seam, reduced elephant feet top/bottom layer. The disadvantage is the reduced quality of walls (perimeters).
Updating the Simplify3D settings
The following steps must be carried out in order to import the new profiles into Simplify3D.
Step 1 – Delete the old FFF profiles:
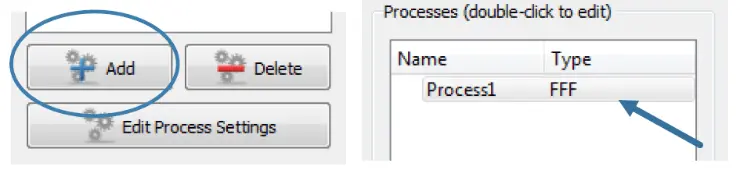
- In the Processes window click on Add. If a process already exists, you can open it with a double click.
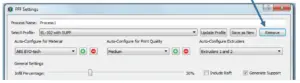
- In the menu that opens, click on Remove
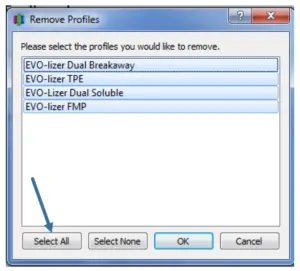
- A selection of possible profiles will be displayed, select all existing EVO-tech profiles here. Do not mark the personally created profiles.

- Then confirm with OK and the profiles will be deleted.
-
End the process window with Cancel or Abort
Step 2 - Loading the new EVO-tech profiles:
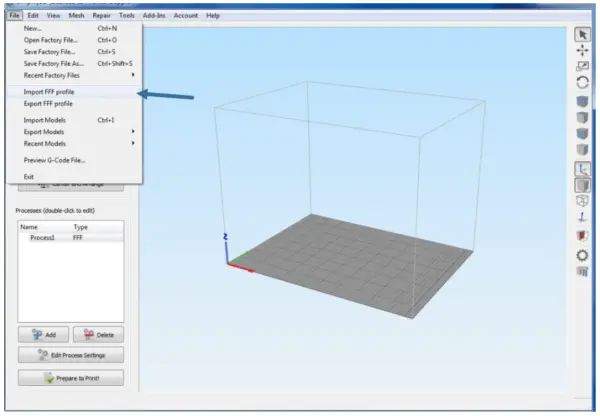
- In the File menu, select Import FFF profile

-
In the following query, select the new files and confirm with OK
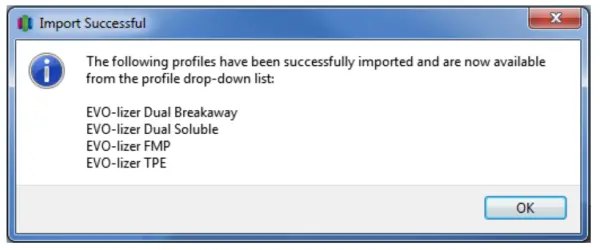
- When the profiles have been imported, Simplify3D displays the following message
-
The new profiles can then be used in the processes.